

Hello and welcome to another beautiful day.
Hope you have had a wonderful day. Tonight
the Art with Heart team girls are sharing some creative projects by adding
texture with embossing. Embossing can add a lovely dimension, and with our
wonderful Stampin’ Up! products, we can create many different looks. These
include Heat embossing using embossing powder, dry embossing using our textured
folders or by adding embossing paste!
I have made 2 projects to share with you tonight, they are quite
different.
The first is a male card and I have used both an embossing folder and
heat embossing to create the texture for this card. A Tarnished Faux Foil
Technique is what I am calling it.

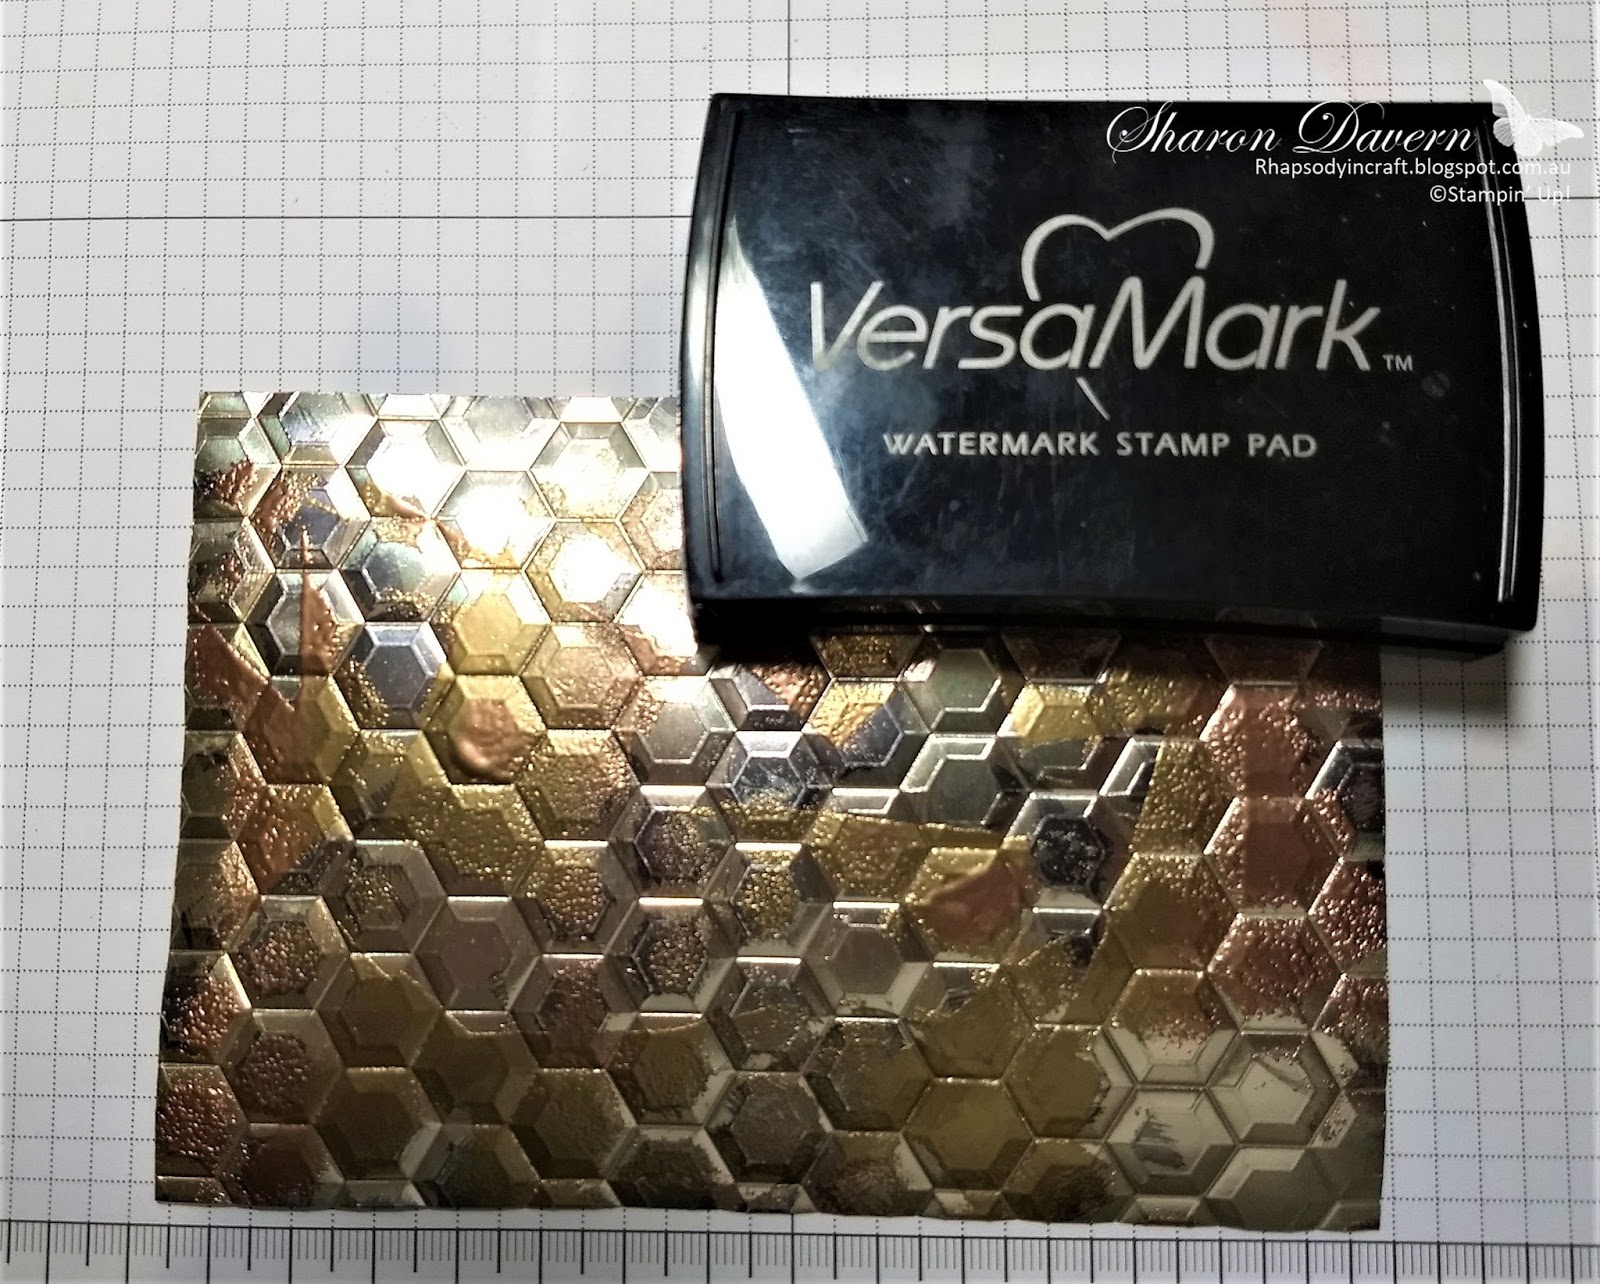
I have run the most gorgeous Champagne Foil paper through the big
shot while in the Hexagon Dynamic TIEF.

After we have embossed with the hexagons I have used memento ink to
create some grunge and some of the tarnished look. Just dab it randomly. You
really need to let this dry completely or use your heat tool to dry it before
the next staged.

The next stage is lots of fun. Grab your VersaMark and just dab it in
random places over your blacked hexagons. Now sprinkle some Gold and Copper
Embossing powder onto your foil making sure you still have some of the foil and
the black showing through and heat set with your heat tool.
Now you have your back ground all set and ready to decorate.
I have decorated the card with some gold metallic thread and I have
teased the gorgeous copper trim out to look like netting. Using the Happy
Birthday Thinlit I have cut out the greeting using basic black card stock and
adhered all of this to the front of the card using the fine tip glue pen.


I think this would make an excellent male birthday card.

I have made a short video showing you how I created the background to
this card.
For my next project I thought I would try something a little different.
I have created a background to my card by using the flower framelit in the
Support ribbon framelits to emboss the card stock.

How I have done this is instead of placing the framelit on the top of
the card stock I placed it under the card stock and made sure the catting side
was also facing away from the card so I didn’t cut out any flowers.

I did have
to put it through a few times to create the whole background but that is ok. I
them sponged the card with powder pink ink so that you could see the definition
of the flowers on the whisper white cardstock. It gives just a subtle
impression on the card but I’m sure a more intricate die would leave a lovely
impression as well.

I have added some flowers cut with the same die from the Support
ribbon framelits in Berry Burst and tranquil tide leaves and a powder pink ribbon.
The gorgeous Metallic Edge Ribbon in Berry Bust I was able to get when I was at
OnStage at the beginning of November and it will be available from January 3rd.
You are going to love it, it is divine!

The sentiment cut out using the stitched shaped framelits is from the
Ribbon of Courage stamp set and I have stamped that in Berry Burst and the
inside of the card is also using the stamps from the same stamp set.

For more product information for both these cards check out the list
below.
PRODUCTS
|
|
Stamps
|
Ribbons
of Courage
|
Card Stock and Papers
|
Whisper
White, Basic Black, Tranquil tide, Powder Pink, Berry Burst, Champagne Roil.
|
Ink
|
VersaMark,
Berry Burst, Early Espresso, Memento
|
Acecessories / Embellishments
|
Copper
Trim, Gold Metallic Trim, Berry Burst Metallic Edge Ribbon.
|
Tools
|
Stitched shaped framelit dies, Support
ribbon framelits, Heagon Dynamic TIEF, Trimmer, paper snips, fast fuse, bone
folder, Gold and copper, embossing powder, heat tool, embossing buddy, Fine tip glue pen
|
Now it’s time to hop on over to our next
participant, the very talented and lovely Kate Morgan

If you
find a broken link or have come to this blog hop from a different entry point,
you can view the participants below:
1. Alisha Watson
2. Ros Davidson
3. Rachel Woollard
4. Sharon Davern
5. Kate Morgan
6. Catherine Proctor
7. Caroline Manwaring
8. Monika O’Neill
9. Tina Gillespie
10. Leanne Mitchell
11. Rachel Palmieri
2. Ros Davidson
3. Rachel Woollard
4. Sharon Davern
5. Kate Morgan
6. Catherine Proctor
7. Caroline Manwaring
8. Monika O’Neill
9. Tina Gillespie
10. Leanne Mitchell
11. Rachel Palmieri
Please contact me for any more information on how to make this card,
on how to get your hands on the Annual Catalogue, the Holiday Catalogue and any
of your Stampin’ Up goodies.
Hope you have a lovely day. Thank you for spending some time with me.
Hope you have a lovely day. Thank you for spending some time with me.
Take Care


.jpg)

.png)